Wet work boots can become a morning problem when they are left beside a heater overnight. Excessive heat may stiffen leather, weaken adhesives, and shrink some materials. A safer routine protects comfort, boot structure, and the skin of your feet.
William A. Rossi, D.P.M., a footwear researcher and author, offered a useful warning: “Heat is the enemy of leather.” That principle guides this practical introduction to how to dry wet work boots overnight safely. The goal is not to force moisture out quickly. It is to remove surface water, improve airflow, and let the boot dry gradually. Remove the insoles and laces first. Press the boots with a dry towel. Then place them near moving air, not directly against a radiator or heat gun.
Small details matter.
A low-temperature boot dryer can help, but only when the manufacturer permits it. Crumpled paper may absorb moisture, although it needs replacement when damp. A fan often works better than people expect. Check the toe box, tongue, and heel counter before wearing the boots again. They should feel dry inside, not merely warm outside. This article’s seven tips focus on safe overnight methods, material care, and warning signs such as cracking leather or a sour odor. Some advice may seem overly cautious. It is. Workers often discover that one rushed drying attempt can ruin an otherwise reliable pair. Proper drying takes patience, and occasionally the boots still need another night.
Before choosing a drying method, identify what your work boots are made from. Full-grain leather can tolerate gentle warmth, but intense heat may shrink it or split its finish. Nubuck and suede need more caution because their raised fibers mark easily. Rubber shells resist water, while synthetic uppers often dry faster but may lose shape near heaters. Check the tongue, lining, outsole, and any waterproof membrane. Materials rarely behave the same way.
Next, judge the moisture rather than guessing. Remove the insoles and laces, then press a clean towel against the lining. If the towel feels damp, the inside still holds water. Look for darkened leather, pooled water near the toe, and moisture around stitched seams. A boot that feels cool may be damp, not merely cold. Weighing each boot can help; a noticeably heavier boot remains saturated. Do not rush this check.
For lightly wet boots, stuff them loosely with plain paper and replace it when damp. For soaked boots, remove removable parts and use moving room-temperature air. Keep boots away from open flames, radiators, ovens, and high-heat dryers. Leather may need conditioning after drying, while suede usually needs brushing only when fully dry. I once assumed a dry outer shell meant the job was finished. It was not. That mistake taught me to inspect the footbed and toe box every time.
Drying wet work boots overnight starts with preparation, not heat. I once left the insoles inside and found damp padding the next morning. That shortcut was a mistake. Remove each insole and place it separately in a ventilated room. Pull out the laces too. Loosened tongues expose hidden moisture around the toe box and eyelets. Shake out grit, mud, and small stones before anything else. Use a soft brush and slightly damp cloth for stubborn dirt. Never seal wet debris inside the boot.
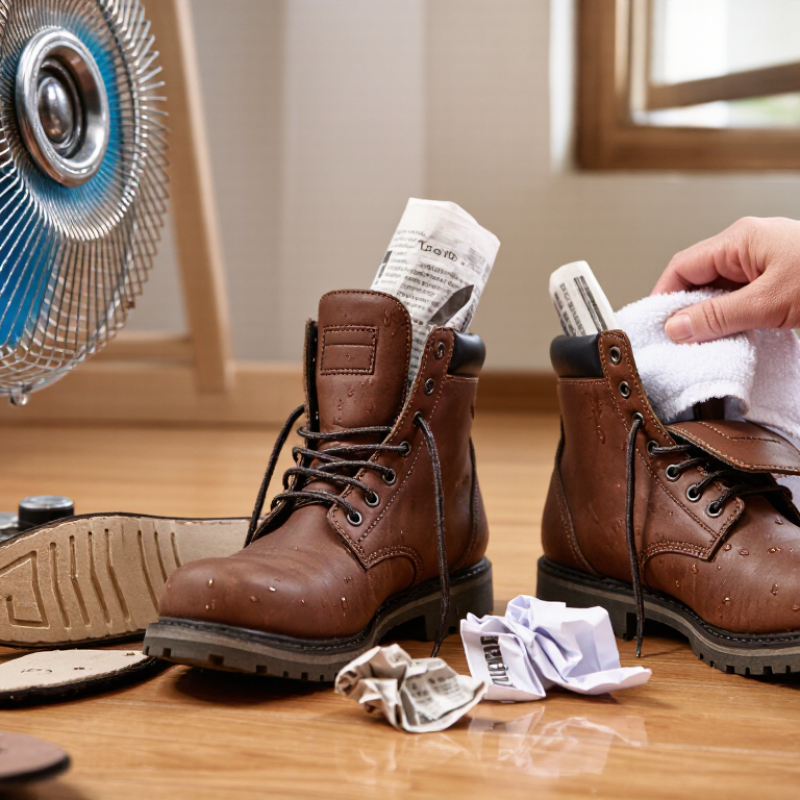
Check the boot material before choosing a drying method. For most leather, fabric, and rubber work boots, steady room-temperature airflow is safer than intense heat. Set the boots upright near a fan, with the openings facing moving air. Keep them away from heaters, ovens, open flames, and harsh sunlight.
High heat can shrink leather, weaken adhesives, or harden protective coatings. Crumple plain paper and change it when damp. Do not pack the boots tightly; air must reach the heel and toe.
Clean the insoles separately and let them dry flat. Wash laces only if their care instructions allow it. Before bedtime, feel the lining near the toe and heel. It should feel cool, not wet. If moisture remains, improve airflow instead of raising the temperature. A footwear dryer may help when used on its lowest suitable setting. I sometimes rush this check. That is when odor and stiff leather return. Inspect the soles and stitching in the morning, especially after muddy outdoor shifts.
Remove the insoles and loosen the laces so damp air can escape. Blot the boot interiors with a clean, dry cloth; avoid rubbing wet leather, which can scuff its surface. Then loosely fill each boot with plain, unprinted paper or absorbent paper towels. Push some toward the toe, but do not pack it tightly. Air needs room to circulate. A crumpled paper ball works well.
Change the paper after two or three hours, or sooner if it feels soaked. Dry paper draws out more moisture than saturated paper. For very wet boots, repeat the blotting and stuffing step before bed. It is a little fussy, honestly, but leaving the same soggy paper inside all night often slows drying. Keep the boots upright in a ventilated room, away from radiators, fireplaces, and direct heat.
Leather and suede need extra care. Use a dry cloth and paper rather than aggressive heat, which may stiffen, crack, or shrink the material. A fan on a low setting can help move room-temperature air nearby. Check the toe and seams in the morning; they may still feel cool or damp. Overnight drying is not guaranteed, especially after heavy soaking, so give the boots more time before wearing them again.
Suggested 8-hour routine using absorbent materials to draw out moisture.
Remove the insoles and loosen the laces, then loosely fill the boots with clean, dry absorbent material such as newspaper or a plain paper towel. Replace it when damp and let the boots air-dry. The intervals shown are a practical schedule, not measured drying-performance data. Avoid radiators and other direct heat, which can damage boot materials.
Wet work boots need patience, not intense heat. Remove the insoles and laces, then press a clean towel against the lining. Do not twist the boots, especially when the leather is swollen. Place them in a ventilated room with the openings facing upward. A small fan can move air through the boots without stripping moisture too quickly.
Tip 1: Keep the airflow gentle and steady.
Use moderate warmth only. A drying fan or room heater should stay several feet away, with air below about 40°C (104°F). Hot air can harden leather, loosen adhesives, and distort synthetic materials. Check the surface every hour. It should feel warm, never hot.
Tip 2: Rotate each boot occasionally for even drying.
A mistake I have made is placing boots too close to a heater; the outside felt dry while the toe remained damp.
Stuff the boots loosely with plain paper or absorbent cloth, then replace it when saturated. Avoid sealed plastic bags, direct sunlight, ovens, and open flames. These methods may dry the surface quickly but can damage the structure.
Tip 3: Test the lining before bed.
Press two fingers inside the toe and heel. If either area feels cool or clammy, continue gentle airflow overnight. After drying, flexible leather may benefit from a suitable conditioner, but use very little. Too much product can trap leftover moisture. Allow the boots to rest before wearing them on another long shift.
Wet work boots need gentle airflow, not aggressive heat. Remove the laces and insoles, then blot standing water with a clean towel. Place the boots in a ventilated room with their openings facing outward. A fan can improve circulation, but keep it several feet away. Avoid radiators, ovens, and hair dryers. High heat may shrink leather, weaken adhesives, or crack protective coatings. Replace damp newspaper after a few hours. It is an old method, but it still helps.
Do not trust a dry-looking surface. Check the toe box, heel, tongue, and seams with clean fingers. The lining should feel dry, not cool or clammy. Press a tissue inside each boot for a few seconds. Any damp mark means the boots need more time. Smell can also reveal trapped moisture, although it is not a perfect test. I once wore boots that felt dry outside but remained wet around the heel. That mistake caused rubbing before lunchtime.
Condition fully dry leather with a small amount of suitable conditioner on a soft cloth. Apply a thin layer, especially around flex points and stitching. Test an unseen area first, since color can change. Synthetic materials may need different care, so follow their care instructions instead of guessing. Let the conditioner absorb, then wipe away residue. Before wearing the boots, check the sole, insert the insoles, and walk indoors for several minutes. If the lining still feels cold or the fit has changed, stop and dry them longer. Dry enough is not always completely dry.
| Tip | What to Do | Overnight Guidance | Safety Check |
|---|---|---|---|
| 1. Remove laces and insoles | Take out removable insoles and loosen or remove the laces so air can reach the boot interior. | Dry these parts separately in a ventilated area; drying time varies with how wet they are. | Do not force out a glued-in insole, which could damage the boot. |
| 2. Blot away surface water | Press a clean, absorbent towel against the outside and inside lining. Avoid aggressive rubbing, especially on leather. | Spend a few minutes removing water before using airflow or absorbent material. | Use a clean towel and avoid twisting or deforming the boot. |
| 3. Loosely fill the boots | Place plain, unprinted absorbent paper inside to draw out moisture. Replace it when it becomes damp. | Check and replace the paper periodically during the evening. | Keep the filling loose; tightly packed paper can restrict airflow. |
| 4. Use gentle room-temperature airflow | Set the boots in a dry, ventilated room with their openings facing outward. A fan can circulate room-temperature air nearby. | Leave space around each boot so air can circulate; very wet boots may need more than one night. | Keep boots and electrical equipment away from standing water. |
| 5. Avoid direct heat | Do not place boots on radiators or near open flames, space heaters, hair dryers, or other intense heat sources. | Choose gradual air drying rather than trying to speed up the process with high heat. | Excessive heat can dry, shrink, crack, or weaken boot materials and adhesives. |
| 6. Check for complete dryness | In the morning, feel the toe, heel, seams, and lining, and check the insoles separately. Look for cool, damp spots. | If any area feels damp, continue air drying before wearing the boots for work. | A dry-looking exterior does not confirm that the lining or insole is dry. |
| 7. Condition and inspect before wearing | Once fully dry, apply a conditioner suitable for the boot material if needed, following its care instructions. Refit dry insoles and laces. | Allow any applied product to absorb or dry as directed before use. | Condition leather only with a compatible product; inspect soles, seams, and fit before returning to work. |
Remove the insoles and press a clean towel against the lining. Check the toe, heel, and stitched seams. A cool, clammy feel can mean trapped moisture.
Take out removable insoles and loosen the laces. This opens the boot for better airflow. Blot the lining gently; do not rub wet leather.
Yes. Loosely fill each boot with plain, unprinted paper, especially near the toe. Replace it every two or three hours, or sooner if soaked. Don’t pack it tightly.
Keep boots several feet away from moderate warmth, with air below about 40°C (104°F). Check them regularly. Warm, not hot.
A small fan can move room-temperature air through boots in a ventilated room. Keep the openings facing upward and rotate the boots occasionally. Overnight drying is not guaranteed.
Use gentle airflow and absorbent paper instead of intense heat. Heat may stiffen, crack, shrink, or mark these materials. Brush suede only after it is fully dry.
Avoid ovens, open flames, radiators, direct sunlight, and high-heat dryers. These can damage materials, adhesives, or boot shape. I once trusted a dry outer shell; the toe was still damp.
Check the footbed, toe, heel, and seams for coolness or dampness. Give the boots more time if any area feels clammy. After drying, leather may need a little conditioner.
Learning how to dry wet work boots overnight safely starts with identifying their materials and checking how thoroughly they are soaked. Leather, suede, and synthetic boots can respond differently to moisture and heat, so avoid rushing the process. Before drying, remove the insoles and laces, then gently wipe away dirt and surface water. This helps air reach more of the boot and reduces lingering moisture.
Loosely fill the boots with absorbent paper or clean cloth, replacing it when it becomes damp. Place the boots in a well-ventilated area with gentle airflow, keeping them away from direct heat that could shrink, crack, or weaken their materials. Check the boots and insoles for dryness before wearing them; if they still feel damp, continue drying rather than relying on outside appearance alone. Once fully dry, apply an appropriate conditioner if the material needs it, helping the boots stay comfortable and maintain their shape.
